You Can Do This by Christmas!
I am using a pattern called The Disappearing 4-Patch also known as the 4 to 9-Patch. There are variations of this block. You can Google 4-Patch www.google.com and come up with several directions. The following is my version. I have been told that I am a pin fanatic and a bit anal about an accurate 1/4" seam. This is how I was taught and I am sort of a perfectionist when it comes to sewing. Now, cooking is another matter. I will change a recipe on a whim. But this is fabric...a littler harder to "doctor up" when not accurate. With that being said, use these directions and tips that suit you and do your own thing!
This block is great for using up scraps. Only thing, you have to cut each one. Well if you use 5” pre-cut squares, called charm packs you get this made a lot quicker and less stress on your wrist. Local quilt stores http://www.creativesewlutions.com/, or www.oakleafquilts.com often have these on sale or you can find them on-line at www.fabricdepot.com or www.ebay.com.
First separate your 5” squares with darks in one pile and the lights in another. Those somewhere in the middle will be used too. This block looks great with high contrast of lights and darks but it also works with medium color value. Just don’t put 4 darks together. Put together sets of 4 that are pleasing to you and set aside as shown above.
Supplies:
At least 30 5” squares (Most charm packs are 42 to a pack). I am using two for this quilt.
Small cutting mat
Rotary cutter
Sharp pins (my favorite are Little House from Japan) http://www.ericas.com/quilting/tools/pinsandneedles.htm
Sewing machine threaded with neutral color thread
Small scissors
Iron
Next, make sure you can sew a ¼” seam. I cannot tell you how important this is when making a quilt top. Some machines have a quarter inch foot where you just butt the fabric next to the foot and you automatically achieve a 1/4” seam. Alas, not all machines are equal. For instance, my Bernina has a “fat” quarter inch. That means it is about 1-2 stitches wider than ¼” so all my seams would be too big. My Featherweight as shown in these pictures has a quarter inch foot and sews an accurate seam. So, you need to find out where your quarter inch seam is on your machine. Here is how you can make sure your machine is sewing an accurate seam.
After you have determined where to place your fabric to sew an accurate ¼” seam, place tape or Post-it©Notes on your throat plate to guide your fabric. Once you get to know your machine and know where to place your fabric, you will be guaranteed to have a straight quilt!
Tip: I have several machines. Once I start a quilt on a particular machine, I finish the top using the same machine to insure accuracy.
Now for your first block! These directions are for 5-inch squares and will finish to an 8” block. If you use a “scant” (less than ¼” seam) the block finishes to a 8.5” block.
Place 4 squares with good contrast in colors or shades and tones on your cutting mat.
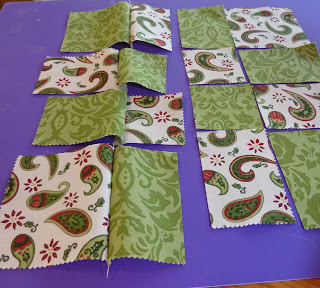
Make 4 cuts without moving the block or the cut pieces. Use a small mat so you can turn the block without disturbing it.
Sew the sections together as shown in the next two photos to complete the block.
You see I pin my pieces together. If there is extra fabric, don't worry. It will come out even. Trust me.
Pin each end first and stop sewing just before a pin. When you are at a seam, make sure your needle is down in the fabric before removing the pin.
Place your first sewn row back on the cutting mat. Pick up the next cut piece to add and work your way down.
Do this until you have added all the pieces. You will notice I have a 1/4" foot on my Featherweight. I butt the fabric right next to the guide. This gives an accurate 1/4" seam but the square will not measure 8.5" which is OK with me. All the squares will be the same size with the same seam. That is most important.
Now take your rows to the iron. Iron each row with the seams going in opposite directions.
With seams going in opposite directions, butt up seams in each row and pin. Sew each row.
Now take your sewn block to the iron. Iron all the rows in one direction.
This may seem tedious to you, but after you have made a few, it will go very quickly. I tried to show each step. Once you get going, the top comes together quickly. I plan on 35 blocks. I will post the next step of putting the blocks together as a top. There are several ways of doing this. Since the blocks are all different, I may sash between each row with a solid color of red or green. Look at the example of sashing in this Jinny Beyer quilt. http://rjrfabrics.com/_media/patterns/pdf/Pinwheel_Sunrise.pdf
If you have any questions or suggestions (or find an error) please do not hesitate to comment.
Until next time, play with your fabric! You have my permission to touch it and cuddle it as much as you want.


No comments:
Post a Comment